 Digital Amateur
TV

 Digital Amateur
TV

| Since before I
got my license I’ve been building, things like my first
stereo system and of course radios. I also rebuilt Mike
G4HMA’s 80m CW tx trom botched together old TV IF bits to
a custom made PCB. My first 2m radio was homebrew, a PW
Avon which was paired with a Daiwa SR9 receiver. Since
then I’ve built many things including my 160W DSP HF radio
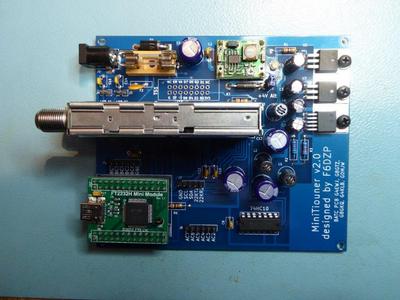
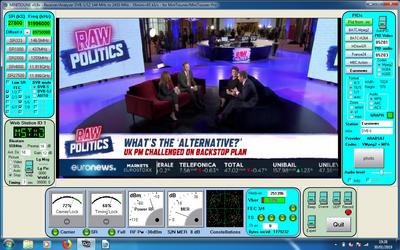
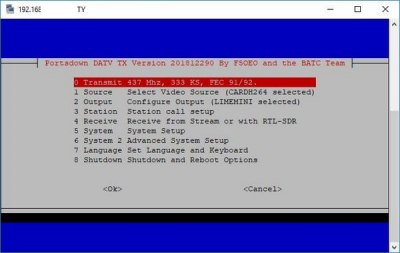
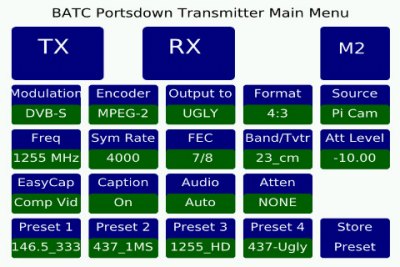
and I’m still building today. For my latest venture I’m stepping outside my comfort zone and I’ve been asked to write something about it for this site. Portsdown Hill in Hampshire has a car park at the top which is quite often frequented by aficionados of VHF and up, Portsdown is also the name given to a major project of the British Amateur Television Club (BATC). Now in it’s fourth incarnation, Portsdown 4 is a DVB-S/S2 and DVB-T transmitter covering 50MHz-5.6GHz based around a Raspberry Pi4 and a SDR unit, either a Lime Mini or an Analog Devices ADALM Pluto. From there the rest of the build is up to the individual, I am going to give you an insight into my Digital TV journey. Some of you may have experienced analogue Amateur TV on 70cms where black and white video with no sound took up 6MHz of bandwidth, digital can give full colour with stereo sound in less than 500KHz. Using advanced encoding some amateurs are using less than 100KHz! I’ll try not to get too in depth or wander off topic but as my kids tell me I’m officially a geriatric, I can’t make promises… A chance meeting with Jim G1AOZ and a natter about what we were doing radio wise led to a suggestion that I should get on ATV. I wasn’t sure, however a couple of weeks later a very cheap Microwave Modules 70cms ATV transmitter appeared on Ebay and I took the plunge. With the tx in my hands I decided to check out where activity was, this led to the BATC website and the realisation that the tx was cheap because everyone is now on digital, bugger! On the site was a link “Getting started in ATV”, here I learned about a new BATC project, the BATC Portsdown and its companion Minitiouner receiver using a satellite NIM (Network Interface Module = tuner unit) and software from Jean-Pieree F6DZP. Interest stirred I headed to other parts of the website to see where the activity is, there was a Portsdown builders map, amazingly on the map was Ian G4EXD at Culgaith! Back to the BATC shop page and an order was placed. Time to warm up the soldering iron. In part 2 which will appear below I’ll tell of my start towards radiating a DATV signal, in the meantime here are some links if you want some further reading. The Portsdown Transmitter The Minitiouner receiver Pt 2 One day the postman arrived carrying a parcel of bits from the BATC, a new journey had begun, a journey still ongoing… Armed with soldering iron and side cutters it was time to commit construction, through hole components are something I haven’t used for a while, there are SMD components but only on pre-assembled modules. First victim of a tin/lead assault was the Minitiouner pcb, it seemed to make sense to build the receiver first, especially as some parts for the Portsdown transmitter had yet to arrive from China. Standard construction principles, power supplies first, 4.1V primary, 3.3V analogue, 3.3V digital and 1.1V digital, all working correctly it was on to the rest of the circuitry. The two major parts of the Minitiouner receiver are the FT2232H USB interface and the Serit FTS-4334LU NIM (satellite tuner unit) which will tune from 143 – 2450 MHz meaning it can receive 146, 437, 23cms, 13cms (including the ISS) without a downconverter. Once all glued together, this is what you get.  The completed RX connects to a PC running F6DZP’s software “Minitioune” via USB and this controls the processor in the NIM as well as decoding the TS (transport stream – the digital video signal) and displaying the output. So how do you test a digital TV receiver without a transmitter? You could connect your TV aerial, but that is picking up DVB-T (digital video broadcasting-terrestrial) signal and our RX is DVB-S (digital video broadcasting-satellite). There are two options, firstly, you can supply a voltage to the aerial socket of the NIM and connect to your satellite dish. A Google search will provide the necessary information to tune to an unscrambled transponder. This is what I did and this is the result.  In part 3 I’ll tell how I started to produce my own video signals. Pt 3 Portsdown 2018 (My first generation Portsdown) Spurred on by the success of a working DVB-S/S2 receiver, what else could I do but try to make some RF to feed to it. Things were about to get ugly, not a reference to yours truly in front of the camera… The heart of the Portsdown is a Raspberry Pi, in its earlier forms a Pi 3B was used along with a 3.5” LCD screen. Amazingly this is the minimum needed to produce a DVB-S signal on 437MHz and we have our second method of testing our receiver build. A “lite” version of the Pi operating system is transferred to an SD card, a lite version boots to the command prompt and doesn’t have the desktop interface or other things we don’t need. Now things get close to witchcraft as far as I’m concerned, that black magic stuff called Linux! Using software called Putty it was time to log into the Pi using something called SSH, very fortunately the BATC instructions take you through every step. They can make things idiotproof, this was even TXJproof, a major achievement. Upon rebooting a menu appears for basic hardware setup, type of screen etc.  Following a second reboot the Portsdown menu greets you like this.  For initial testing the least you need is the Pi and a screen, 3.5” or 7”, you don’t even need a camera. Selecting freq = “437MHz”, source = “test card” and output to “ugly” then tapping “TX” the Pi radiates a signal from one its GPIO pins, a harmonic of which is on 437MHz. This isn’t going to get you any DX but it will allow reception across the shack. To this base, other parts are added, a Pi camera (or USB webcam) gives you the ability to put your face (or anything else) on screen but to get real DVB-S you can send to others the Portsdown 2018 uses a “filter-modulator” board with a synthesizer using an ADF4351, (which can also function as a 35MHz-4GHz signal generator). BATC produces PCB’s for useful add-ons such as a band switched LO filter, RF output switches and PTT steering. Every part you add gives more flexibility, an “Easy-Cap” USB video capture device adds the capacity for other cameras, a USB sound dongle gives a microphone socket too. You may have noticed an “RX” button, this allows you to control a connected Minitiouner using built in “Long Mynd” software by Heather M0HMO, an example of the cooperation present in the DATV scene. With an added RTL-SDR dongle you have other reception facilities too, such as listening to your favourite FM broadcast station if the band is quiet and of course DATV talkback on 144.750MHz. Another feature is the ability to watch the feeds from the BATC streaming service featuring video from many DATV repeaters and the stations of individual amateurs. As you can see, Portsdown really is the Swiss Army knife of DATV, in part 4 I’ll talk about the linear amplifiers external to the Portsdown. |
|
| Guestbook | |
| Links | |
| About me | |
| The Shack | |
| Guestbook | |
| Links | |